

Anyone who has used Google Optimize will know it’s a quick and easy way to run landing page experiments that can help boost on-site conversion rates.
However, you may have noticed page flickering on some of your Optimize experiments. This can negatively impact user experience and skew test results. It needs fixing!
This post is aimed at paid media professionals that find themselves in a specific scenario. You will have:
- Implemented Optimize on a client’s website.
- Seen your Optimize experiments exhibit page-flicker.
- Have no available dev resource to resolve the issue.
Without a developer to help, you will need to implement Google’s anti-flicker snippet on your client’s website yourself.
Like most paid media specialists, you’ve probably implemented Optimize (and various other tags) using Google Tag Manager (GTM). Unfortunately, adding the anti-flicker snippet to your client’s website will mean leaving the safety of GTM behind!
The anti-flicker snippet needs to fire before the Optimize tag to stop the page flickering. Therefore, it must be placed before the Optimize tag in the <head> of the page. If your Optimize tag is inside a GTM container, this means the anti-flicker snippet must be placed in the <head> of the page, before (and thus outside of) the GTM container.
Here is the anti-flicker snippet in its original form, taken from Google’s support page:
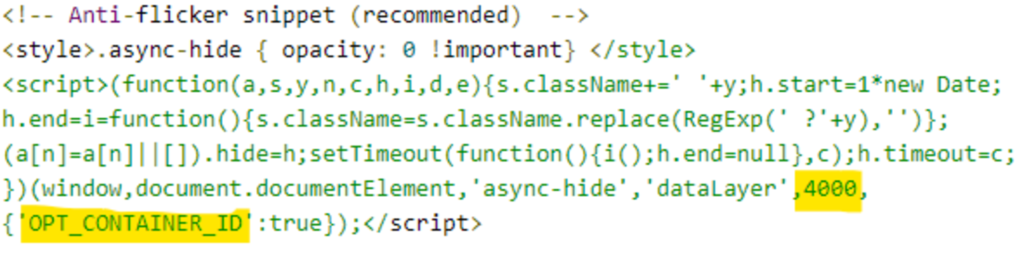
I have highlighted the Optimize container ID (OPT_Container_ID) as, if you are using GTM, you will need to swap this with a GTM container ID.
You will see I have also highlighted the number 4000. After reading some great advice from Ryan Bromley on the Zengenti blog, you may also want to change the highlighted 4000 to 1000.
This number is the length of time (in milliseconds) the anti-flicker snippet has to load before timing out and showing the original page content. Here’s Ryan’s explanation as to why you might want to lower this number:
“Because ad blocking browser plugins can stop Optimize from loading, any visitors using an ad blocker may have to wait 4 seconds for the anti-flicker snippet to timeout before they see any content, impacting their user experience. To avoid this, change the number 4000 at the end of the snippet to 1000 to make Optimize timeout after 1 second.”
Essentially, lowering the timeout limit to one second should stop users bouncing if there are issues loading Optimize.
With the suggested changes above made, your anti-flicker snippet should now look similar to the one below:
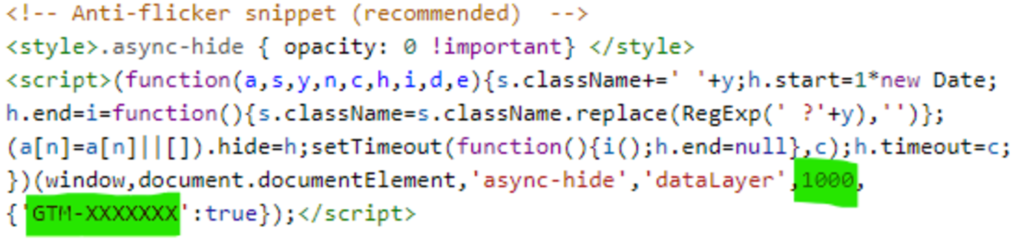
You can see that I’ve replaced the Optimize container ID with the GTM container I used to implement Optimize on the client’s site, as well as lowering the timeout from 4000ms to 1000ms.
The final step is to place this snippet in the <head> of any page where Optimize is running. It must be placed as early in the <head> as possible, after the data layer declaration (if this is present), but as stated earlier, before the Optimize or GTM container.
If your client’s website was built using WordPress, please find a guide below, detailing how to implement the snippet on every page of their site.
N.B Before making the changes below, it may be worthwhile copying the entire theme header file into a plain text editor. This means, should you make an error implementing the anti-flicker snippet, you can easily paste the untouched theme header back into the theme editor and return the site header to its previous state.
Here’s the implementation guide:
- Log into your client’s WordPress admin area.
- Click Appearance > Theme Editor (in the left-hand column).
- Click Theme Header (from right-hand Theme Files column).
- Paste the anti-flicker snippet into the theme header, between <head> and </head>, ensuring the snippet is placed before your GTM or Optimize container.
- Click the Update File button.
That’s it! Your Optimize experiments should now be flicker-free.
Whilst this is an easy problem to fix, a lot of paid media professionals rarely venture beyond GTM and so making changes to a client’s website like this can be a little daunting. Hopefully, this brief guide will be helpful for anyone in that position!